Auto ISO lets the camera change ISO automatically when the light changes.
Used properly, it can be one of the most useful camera settings for beginners and experienced photographers alike.
What is Auto ISO?
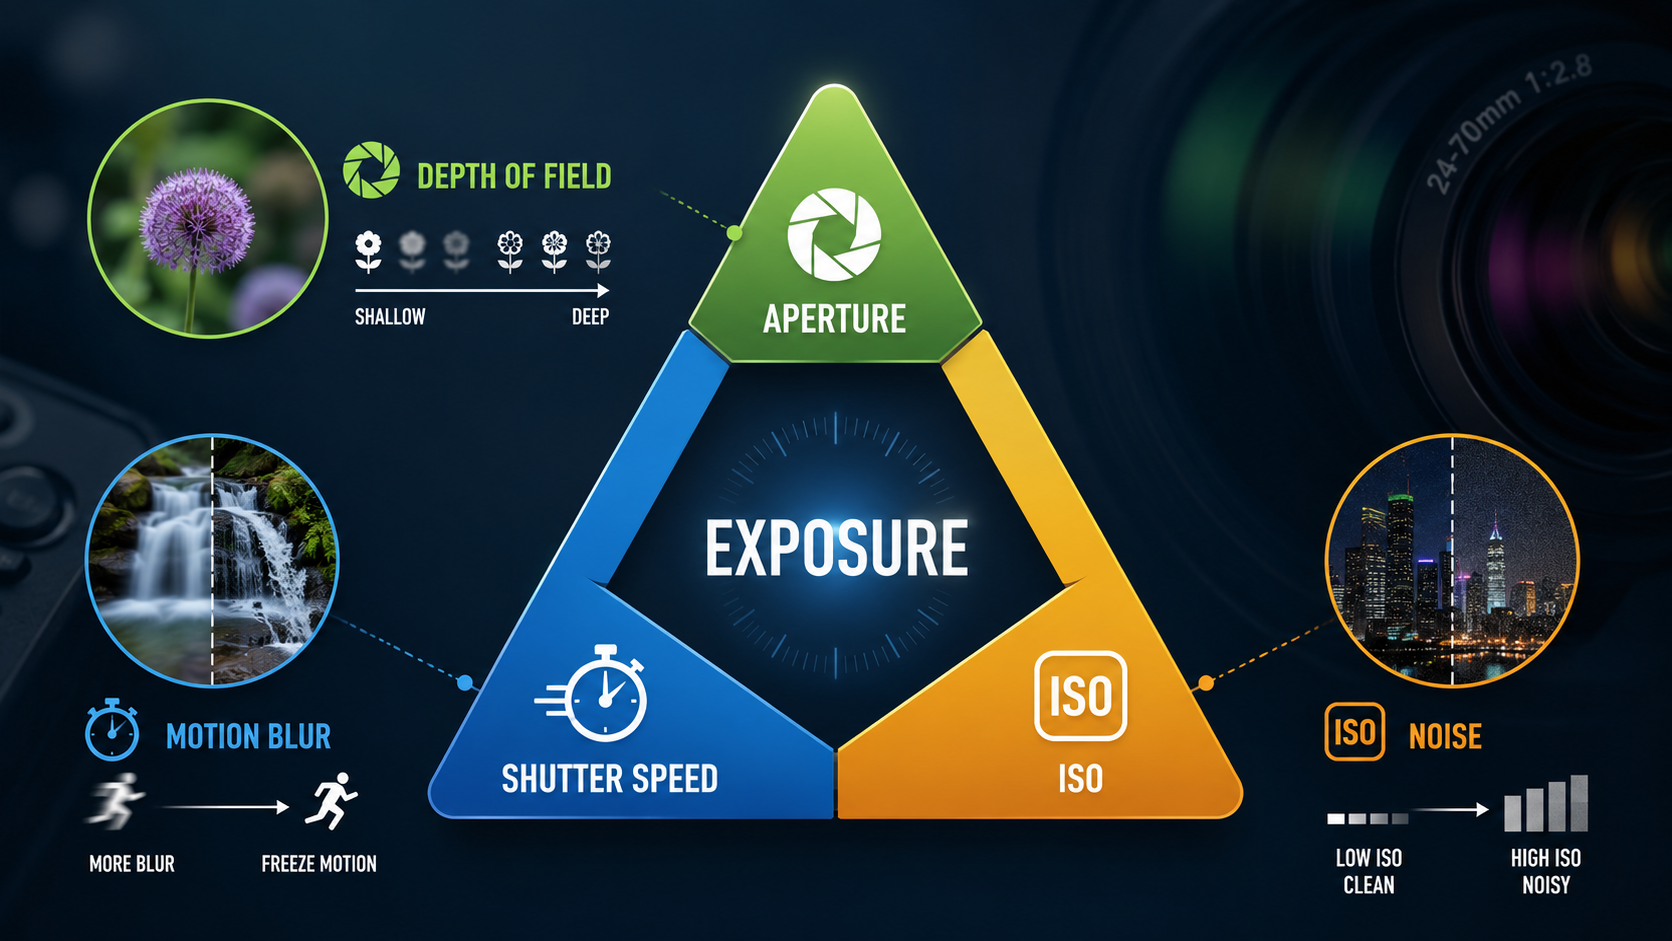
Normally, ISO is one of the three exposure controls alongside aperture and shutter speed.
With Auto ISO enabled, the camera is allowed to adjust ISO automatically within limits you set.
That means you can concentrate on aperture, shutter speed or both, depending on the exposure mode.
If ISO itself is new to you, start with my ISO guide .
Why use Auto ISO?
Light can change quickly.
Imagine photographing somebody walking between bright sunlight and shade.
With a fixed ISO, you may constantly need to adjust exposure.
Auto ISO can react automatically while you keep your preferred aperture or shutter speed.
Does Auto ISO mean the camera is fully automatic?
No.
You can still control the important creative decisions.
For example, in Manual mode with Auto ISO you can choose:
- the exact aperture;
- the exact shutter speed;
- the composition;
- the focus settings.
The camera then adjusts ISO to achieve the metered exposure.
Auto ISO in Aperture Priority
Aperture Priority is one of the easiest ways to use Auto ISO.
You choose the aperture.
The camera normally chooses the shutter speed and can increase ISO when light becomes too low.
This is particularly useful for:
- portraits;
- travel;
- street photography;
- weddings;
- events;
- general hand-held photography.
What is Minimum Shutter Speed in Auto ISO?
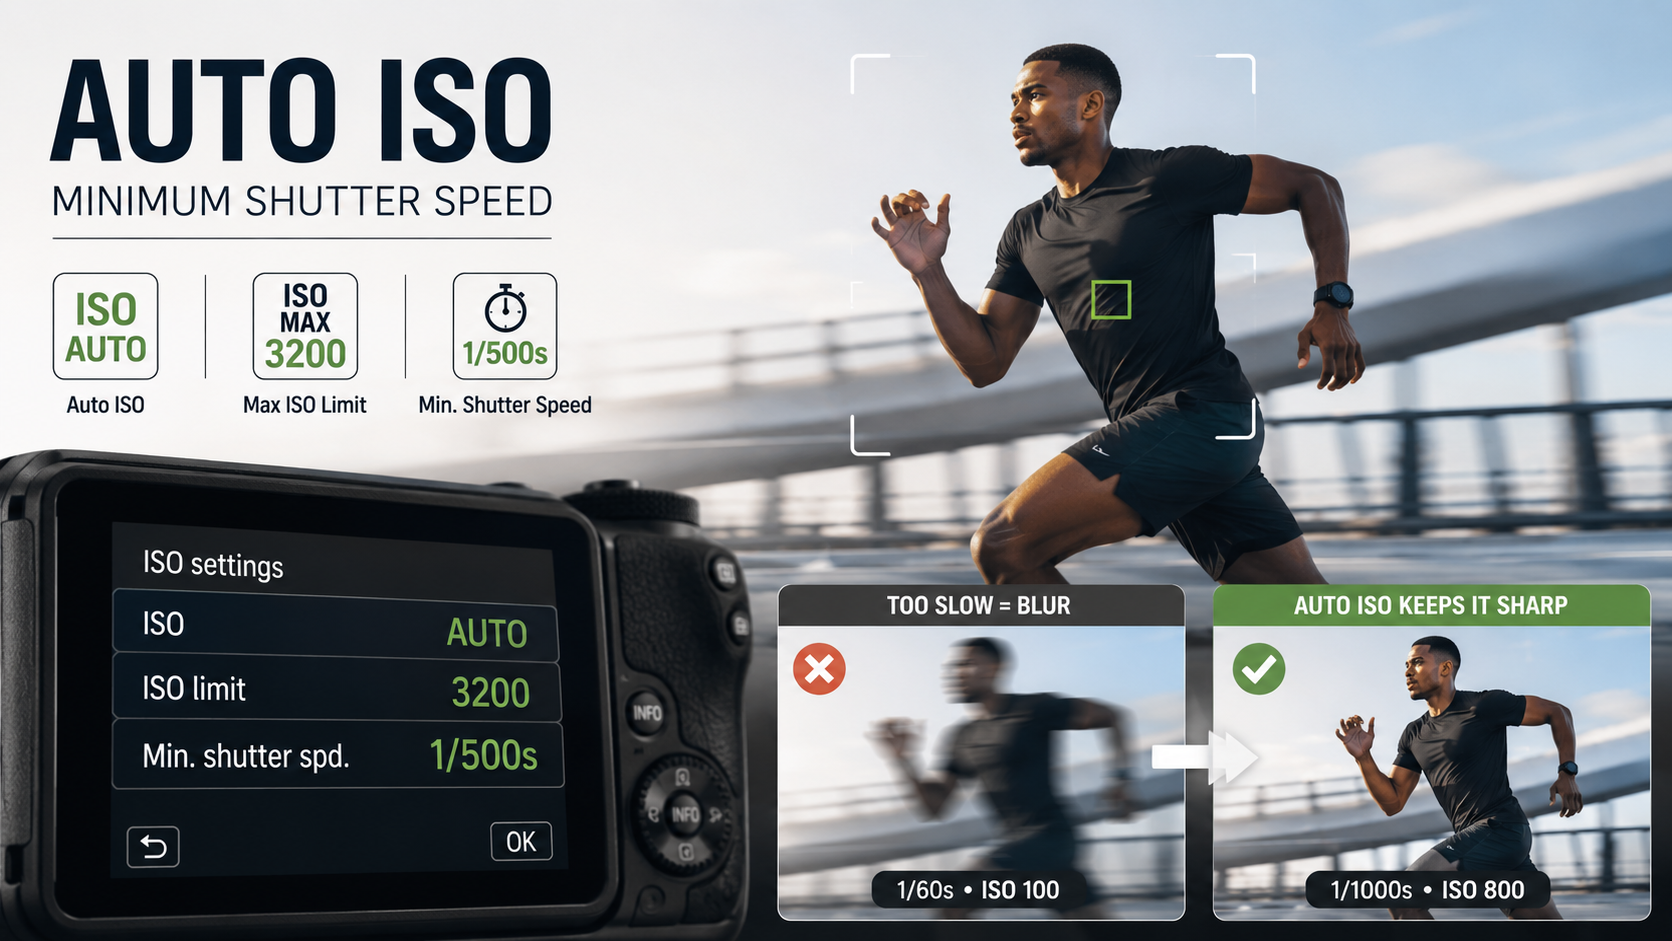
On many cameras, Auto ISO includes a setting called Minimum Shutter Speed.
This tells the camera roughly how slow you are willing to let the shutter speed become before it starts raising ISO.
For example, if you set a minimum shutter speed of 1/250 second, the camera will generally try to avoid dropping below 1/250 by increasing ISO.
Exact behaviour varies by camera and exposure mode.
Does Minimum Shutter Speed guarantee that speed?
Not always.
It is often better thought of as a preference or threshold rather than an absolute guarantee.
If the camera reaches your maximum allowed ISO and there still is not enough light, some cameras may allow shutter speed to fall below the minimum.
Why is minimum shutter speed important?
The camera cannot know whether your subject is a stationary building or a child running towards you unless its automation is specifically designed to recognise that situation.
A shutter speed that is safe for one subject may be far too slow for another.
Minimum Shutter Speed lets you tell the camera how much movement you expect.
Suggested minimum shutter speeds
These are starting points, not fixed rules:
| Subject | Possible starting point |
|---|---|
| Stationary subject | 1/60 - 1/125 sec |
| People standing / gentle movement | 1/125 - 1/250 sec |
| Children moving | 1/250 - 1/500 sec |
| Sport | 1/500 - 1/1000 sec or faster |
| Birds in flight | Often 1/1000 sec or faster |
Subject speed, focal length and the look you want all matter.
Read my Shutter Speed guide for a fuller explanation.
Auto ISO in Manual mode
Manual mode with Auto ISO is extremely useful.
You choose:
- the aperture for depth of field;
- the shutter speed for movement;
- the camera chooses ISO as the light changes.
This gives you direct control over the two settings that most affect the visual appearance of the photograph.
Example: photographing sport with Manual + Auto ISO
Suppose you are photographing football.
You might choose:
- 1/1000 second to freeze action;
- f/2.8 or f/4 for the depth of field you want;
- Auto ISO to react as players move between light and shade.
The camera can then increase or reduce ISO while your aperture and shutter speed remain unchanged.
Example: event photography
Imagine photographing an indoor event.
You want enough shutter speed to stop people becoming blurred and a suitable aperture to keep the important subjects sharp.
Manual + Auto ISO can let you lock those choices while ISO moves as lighting changes.
Auto ISO and Aperture Priority for portraits
Suppose you want f/2.8 for a portrait.
Aperture Priority with Auto ISO lets you keep f/2.8 while the camera chooses shutter speed and raises ISO when necessary.
Setting a sensible minimum shutter speed helps prevent the shutter becoming too slow for your subject.
Depth of field itself is covered in my Depth of Field guide .
What should Maximum ISO be set to?
Auto ISO normally allows you to set an upper ISO limit.
There is no universal perfect maximum.
It depends on:
- your camera;
- how much noise you find acceptable;
- how important the photograph is;
- whether the image will be printed large;
- whether missing the photograph would be worse than having noise.
Is a noisy sharp photo better than a clean blurry photo?
Very often, yes.
Beginners sometimes keep ISO too low because they are afraid of noise.
The camera then chooses a shutter speed that is too slow and the subject becomes blurred.
Moderate noise can often be reduced later.
Severe motion blur usually cannot.
Auto ISO and camera shake
Minimum Shutter Speed can also help reduce camera shake.
The traditional guideline is that hand-held shutter speed should be related to focal length.
Modern image stabilisation can allow much slower speeds for stationary subjects, but stabilisation does not stop your subject moving.
Auto Minimum Shutter Speed
Some cameras offer an automatic minimum shutter-speed option.
The camera may choose a threshold based partly on focal length.
Some models also let you bias this behaviour towards:
- slower;
- standard;
- faster shutter speeds.
Names and exact behaviour vary by manufacturer.
When should I choose a faster minimum shutter?
Choose a faster minimum when:
- the subject is moving;
- you are using a long lens;
- you are photographing children;
- you are shooting sport or wildlife;
- you are moving yourself while shooting;
- sharpness matters more than keeping ISO low.
When can I use a slower minimum shutter?
Slower speeds may be suitable when:
- the subject is stationary;
- you are using a wide-angle lens;
- your camera or lens has effective stabilisation;
- you deliberately want motion blur;
- the camera is supported.
Auto ISO and Exposure Compensation
Auto ISO does not mean you have to accept the camera's meter unquestioningly.
Exposure Compensation can tell the camera to make the image brighter or darker than its normal metered result.
In Aperture Priority this is normally straightforward.
In Manual mode with Auto ISO, Exposure Compensation support and control behaviour vary between camera models, particularly older cameras.
Read my Exposure Compensation guide for the basics.
Auto ISO and Exposure Lock
Auto ISO and AE-L can interact because ISO is part of the automated exposure decision.
Exactly what gets held when you activate AE-L depends on the camera, exposure mode and custom settings.
Read my Exposure Lock guide for the full explanation.
Auto ISO and the Exposure Triangle
Auto ISO does not remove ISO from the exposure triangle.
It simply lets the camera control that part of the triangle within boundaries you define.
Read my Exposure Triangle guide if aperture, shutter speed and ISO are not yet second nature.
When should beginners use Auto ISO?
Auto ISO is particularly useful when:
- light changes quickly;
- you are shooting hand-held;
- subject movement matters;
- you want to concentrate on aperture and shutter speed;
- you are photographing events, sport, wildlife or street scenes.
When might fixed ISO be better?
Fixed ISO can be preferable when:
- the camera is on a tripod;
- lighting is completely controlled;
- you are in a studio;
- you are creating a panorama;
- you need perfectly consistent exposure settings between frames;
- you deliberately want full manual control of all three settings.
Auto ISO for landscapes
Auto ISO can be useful for hand-held landscapes when light changes.
But when the camera is firmly on a tripod and the subject is stationary, photographers often prefer a low fixed ISO and allow a longer shutter speed instead.
Auto ISO for wildlife
Wildlife is one of the strongest uses for Auto ISO.
You may need a fast shutter speed for movement and a particular aperture for enough depth of field.
Auto ISO can adapt as the animal moves between different light.
Auto ISO for street photography
Street scenes can change quickly.
Moving between sunlight, shade and indoor areas can cause several stops of exposure change.
Auto ISO helps the camera react while you concentrate on timing and composition.
A simple beginner Auto ISO setup
- Turn Auto ISO on.
- Set the lowest ISO allowed to your camera's normal base range.
- Choose a sensible maximum ISO for your camera.
- Set a minimum shutter speed appropriate to your subject.
- Use Aperture Priority to control depth of field.
- Watch the shutter speed and ISO in the viewfinder.
- Increase minimum shutter speed if your subjects are blurred.
- Raise the maximum ISO if the camera cannot maintain the speed you need.
A simple Manual + Auto ISO setup
- Choose Manual exposure mode.
- Choose the aperture you need.
- Choose the shutter speed needed for movement.
- Enable Auto ISO.
- Set an appropriate maximum ISO.
- Let ISO respond as light changes.
- Watch for the camera reaching your ISO limit.
Common beginner Auto ISO mistakes
Setting the maximum ISO too low
The camera reaches its limit and may be forced into an unsuitable shutter speed.
Using a minimum shutter speed that is too slow
The exposure looks fine, but the moving subject is blurred.
Using a minimum shutter speed that is unnecessarily fast
ISO rises much higher than needed for a stationary subject.
Being afraid of ISO
A usable high-ISO photograph can be much better than a low-ISO photograph ruined by movement.
Not noticing the ISO limit has been reached
Once the camera has nowhere else to go, exposure or shutter speed may no longer behave as you expect.
Auto ISO - key points
- Auto ISO lets the camera adjust ISO as light changes.
- You can normally set minimum and maximum ISO limits.
- Minimum Shutter Speed helps protect against blur.
- It is extremely useful in Aperture Priority.
- Manual + Auto ISO gives control of aperture and shutter speed.
- High ISO is often preferable to unwanted motion blur.
- Exact behaviour varies between camera manufacturers and models.
Want camera settings that make sense in the real world?
My beginner photography courses cover Auto ISO, shutter speed, aperture, exposure, focusing and practical camera control step by step.
Explore beginner photography coursesContinue learning exposure

Andy Hornby
Photographer, educator and workshop leader with more than twenty-five years of practical photography experience.
Learn with Andy