Your camera's metering system measures the light in a scene and helps decide what exposure settings should produce an appropriate brightness.
Metering modes tell the camera which parts of the scene should influence that decision most.
What is camera metering?
Modern cameras contain a light meter that measures brightness in the scene.
In automatic and semi-automatic exposure modes, the camera uses that information to help choose aperture, shutter speed, ISO or a combination of those settings.
In Manual mode, the meter still gives you information even though you are choosing the settings yourself.
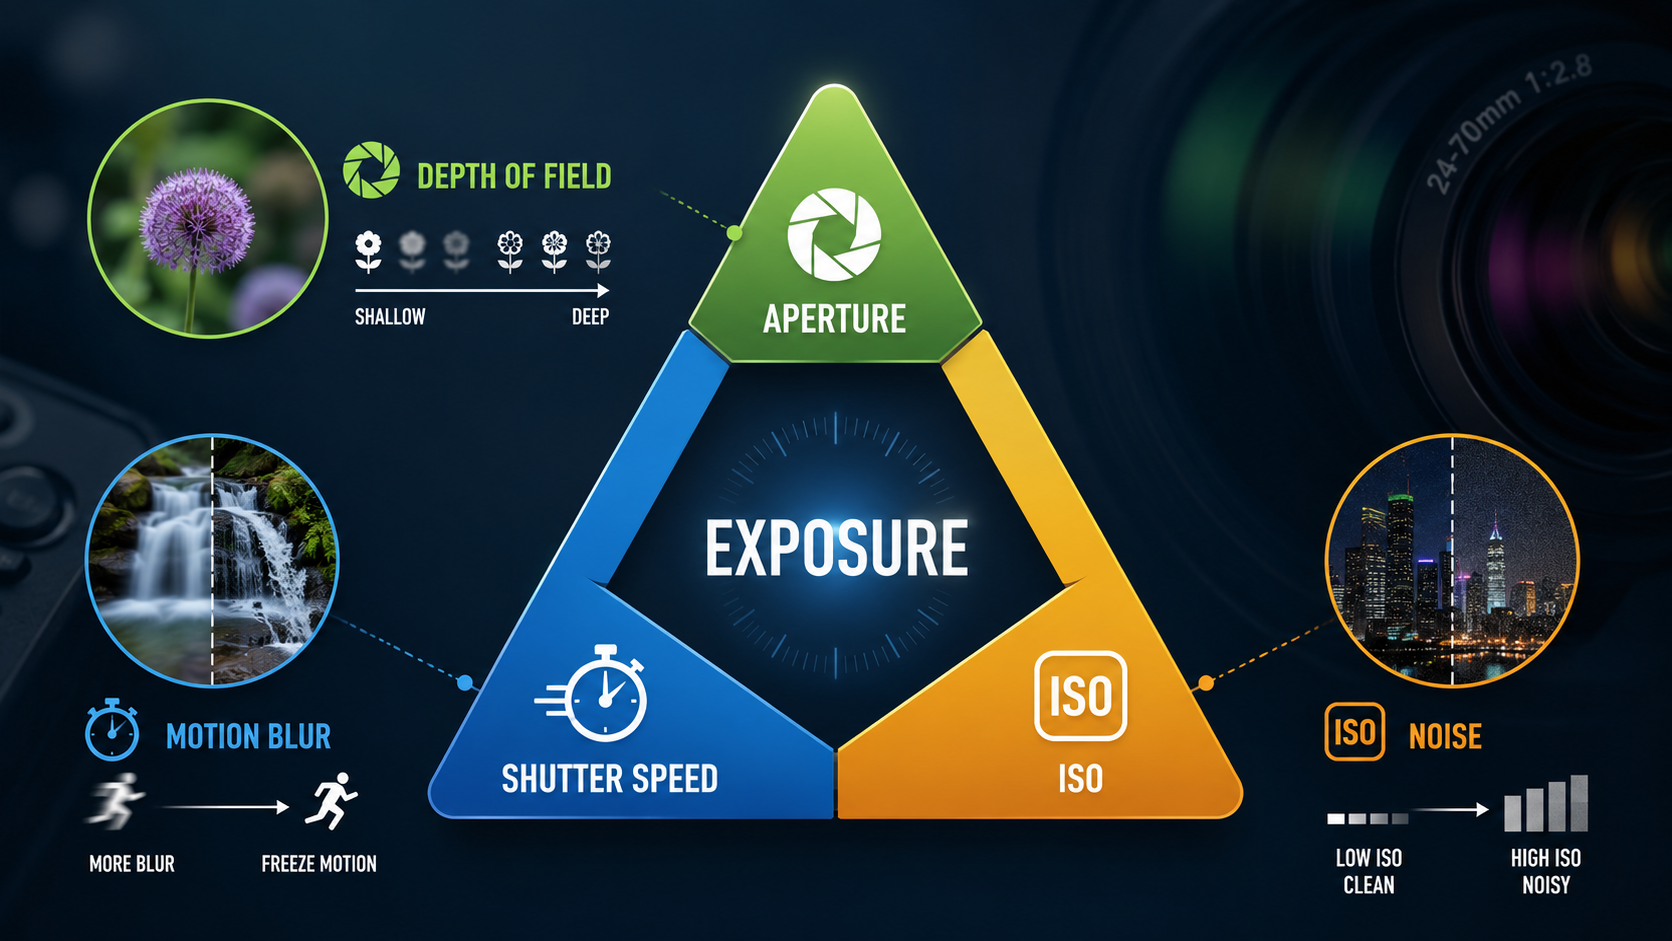
Metering becomes much easier to understand once you know how the exposure triangle works.
Why do cameras have different metering modes?
A camera cannot truly understand what the important subject is or how bright you want the photograph to look.
It can only measure light and make a judgement.
Different metering modes let you influence where the camera looks when making that judgement.
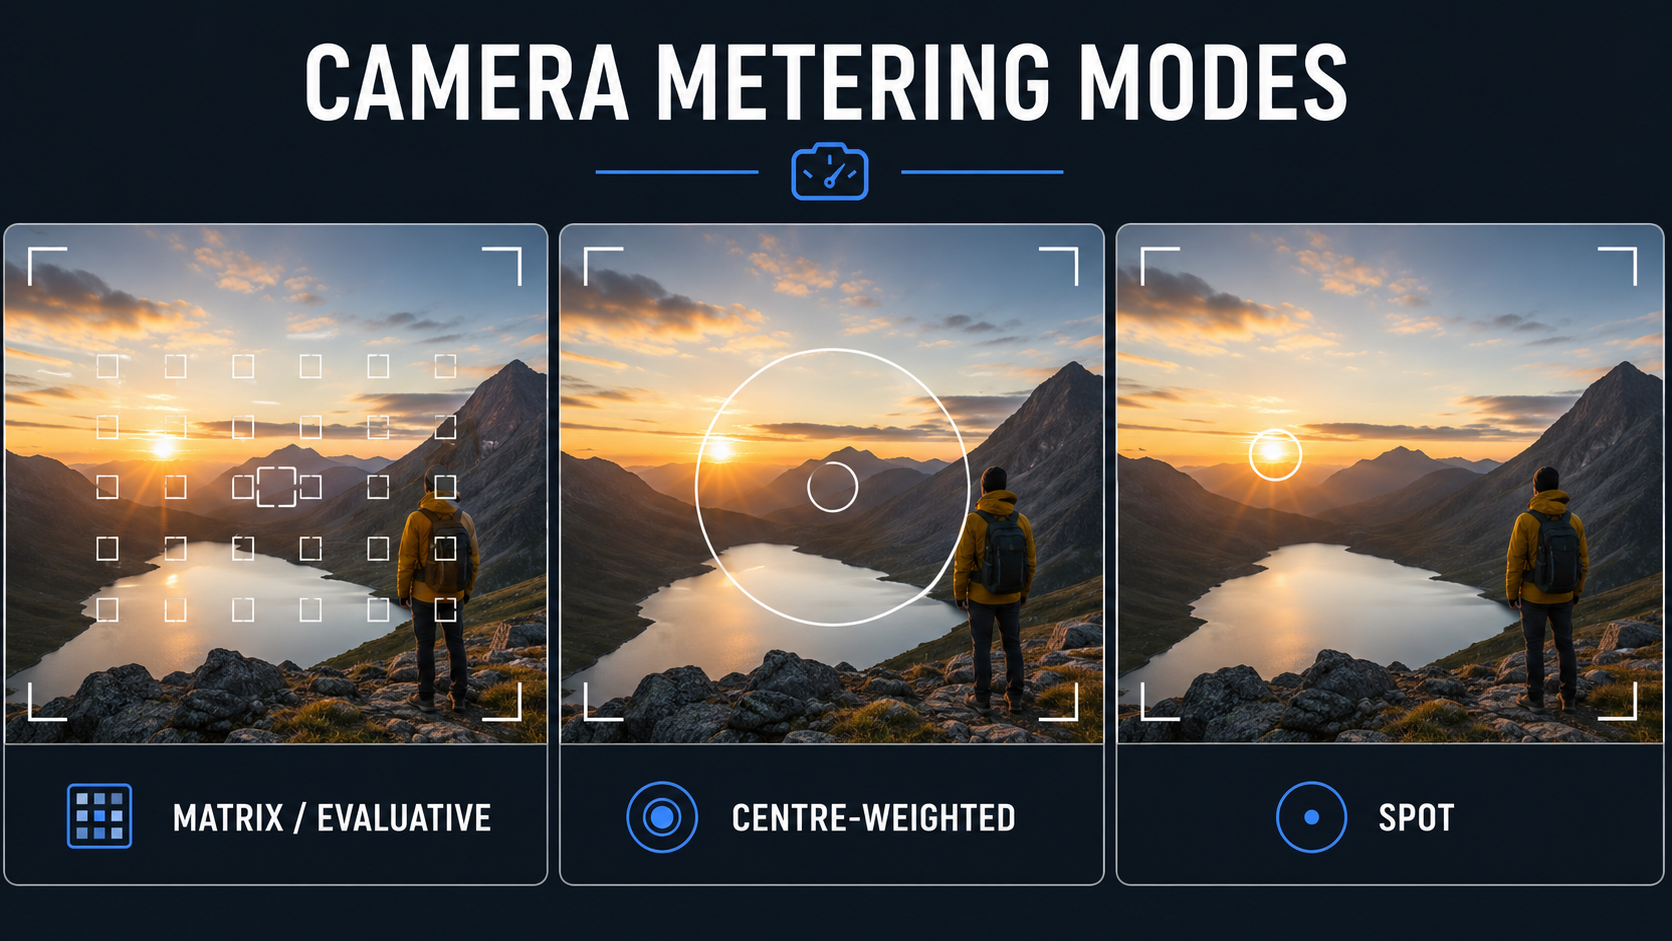
Matrix or Evaluative Metering
Matrix Metering, Evaluative Metering and Multi-Segment Metering are different manufacturers' names for broadly similar ideas.
The camera divides much or all of the frame into multiple zones, measures them and combines that information to estimate a suitable exposure.
Modern cameras may also consider things such as:
- focus point position;
- subject detection;
- colour;
- brightness patterns;
- highlight areas;
- camera-specific scene recognition.
For most beginners, this is normally the best general-purpose metering mode to leave the camera in.
When to use Matrix or Evaluative Metering
- general photography;
- travel;
- street photography;
- landscapes;
- portraits in fairly even light;
- events;
- situations where the lighting is changing quickly.
Centre-Weighted Metering
Centre-Weighted Metering measures the whole frame but gives extra importance to the central area.
This can be useful when your subject is near the centre and you do not want very bright or dark edges of the frame to influence the reading as strongly.
When to use Centre-Weighted Metering
- centrally positioned portraits;
- subjects against brighter or darker backgrounds;
- situations where the centre of the frame matters most;
- photographers who prefer a more predictable traditional metering pattern.
Spot Metering
Spot Metering measures a very small part of the frame.
This gives you much more precise control over which area of the scene the camera uses for its exposure reading.
The exact size and position of the spot varies by camera. On some models it remains in the centre; on others it can follow the selected autofocus point.
When to use Spot Metering
- backlit portraits;
- stage performances;
- small bright subjects against dark backgrounds;
- small dark subjects against bright backgrounds;
- wildlife;
- high-contrast scenes;
- situations where one specific area must be measured accurately.
Partial Metering
Some cameras, particularly certain Canon models, also offer Partial Metering.
It works similarly to Spot Metering but measures a larger portion of the frame.
It can be useful when the subject occupies a relatively small area but Spot Metering would be too precise or difficult to use.
Metering mode names vary by camera brand
| General idea | Common names |
|---|---|
| Whole-frame intelligent metering | Matrix, Evaluative, Multi, Multi-Segment, Multi-Pattern |
| Centre-focused averaging | Centre-Weighted, Centre-Weighted Average |
| Small-area measurement | Spot Metering |
| Larger small-area measurement | Partial Metering |
Your own camera manual will tell you exactly how each mode behaves.
Which metering mode should beginners use?
For most beginner photographers, start with Matrix, Evaluative or Multi-Segment Metering.
Modern cameras are generally very good at reading ordinary scenes using their whole-frame metering systems.
You do not need to constantly change metering mode.
When the camera consistently makes a particular scene too bright or too dark, you can often correct it quickly using exposure compensation .
Metering and exposure compensation
Metering and exposure compensation work closely together.
Metering decides what the camera believes is an appropriate brightness.
Exposure compensation lets you tell the camera: I want the result brighter or darker than that.
For example, a snowy scene may cause the meter to produce a darker result than you want.
Rather than changing metering mode, adding positive exposure compensation may be the quickest solution.
Another useful metering technique is to take a reading from the part of the scene that matters and then keep that exposure while recomposing. That is what Exposure Lock or AE-L is designed to do.
Metering in Aperture Priority
In Aperture Priority , you choose the aperture.
The meter evaluates the scene and the camera normally chooses the shutter speed required to reach its target exposure.
If you apply exposure compensation, the camera changes that target and therefore adjusts the shutter speed accordingly.
Metering in Shutter Priority
In Shutter Priority, you choose the shutter speed.
The meter measures the scene and the camera normally selects the aperture needed to reach the target exposure.
Exposure compensation changes that target, provided the lens has enough available aperture range.
Metering in Manual mode
Manual mode does not switch the light meter off.
Instead, the meter normally shows whether the camera believes your chosen settings will produce an exposure above, below or close to its recommended value.
You then decide whether to follow that recommendation.
This is an important distinction: the meter is a guide, not a rule.
Why bright scenes can fool the meter
Cameras often try to produce a balanced average brightness.
If the scene contains lots of very bright tones, the meter may reduce the exposure too much.
Examples include:
- snow;
- white walls;
- bright beaches;
- white clothing;
- strong backlighting.
This is why bright subjects can sometimes come out darker than expected.
Why dark scenes can fool the meter
The opposite can happen when most of the scene is dark.
The camera may try to brighten it, producing a result that looks lighter than the scene should.
Examples include:
- night scenes;
- black clothing;
- dark interiors;
- concerts;
- low-key portraits.
Example: backlit portrait
Imagine photographing a person standing against a very bright sky.
Matrix or Evaluative Metering may consider the whole scene and produce an exposure where the sky looks reasonable but the person's face is too dark.
You have several possible solutions:
- use positive exposure compensation;
- use Spot Metering on the face;
- use fill flash;
- change your position or composition;
- switch to Manual exposure.
There is rarely only one correct photographic solution.
Example: performer on a dark stage
A brightly lit performer surrounded by a mostly dark stage can confuse whole-frame metering.
The camera may try to brighten the dark surroundings and overexpose the performer.
Spot Metering on the illuminated subject, negative exposure compensation or Manual exposure may all be useful approaches.
Metering and protecting highlights
Sometimes the brightest important part of the photograph matters more than the average brightness of the scene.
In these situations, you may deliberately expose more cautiously so important highlights are not lost.
Read my guide to exposing for the highlights for more detail.
Do you need Spot Metering to be accurate?
No.
Spot Metering is precise, but precision is only useful if you know what you are measuring and how bright that area should appear.
If you meter a white dress and expect the camera to make it appear bright white automatically, for example, you may still need exposure compensation because the meter itself does not know the subject is supposed to be white.
Metering mode vs autofocus mode
Metering mode and autofocus mode are separate systems.
Metering controls how the camera measures brightness.
Autofocus controls how the camera acquires and maintains focus.
Some cameras allow metering behaviour to be linked to the active focus point, but the two concepts should not be confused.
A simple beginner metering workflow
- Start with Matrix, Evaluative or your camera's equivalent general-purpose metering mode.
- Take a photograph.
- Check the important parts of the image.
- If it is too bright or dark, try exposure compensation.
- Use Spot or Centre-Weighted Metering when the subject needs more specific measurement.
- Check highlights and the histogram when exposure is critical.
Camera metering modes - key points
- Matrix or Evaluative Metering is the best general starting point for most beginners.
- Centre-Weighted Metering gives more importance to the centre.
- Spot Metering measures a very small area.
- Metering mode names vary between camera brands.
- The camera meter does not know how bright you creatively want the photograph to look.
- Exposure compensation lets you override the camera's target brightness.
- Manual mode still uses the meter as a guide.
Want to understand what your camera is doing?
My beginner photography courses teach aperture, shutter speed, ISO, exposure modes, metering and practical camera control step by step. You can learn online or through practical one-to-one tuition around Portsmouth.
Explore beginner photography coursesContinue learning exposure
Exposure Triangle
Read GuideCamera Modes
Read GuideExposure Compensation
Read GuideHighlights
Read Guide
Andy Hornby
Photographer, educator and workshop leader with more than twenty-five years of practical photography experience.
Learn with Andy